
Self Hosting / Try Flow locally
Try Flow locally
Verified against Flow 5.0.0-beta.39
On this page
This quickstart runs Boomerang Flow on your laptop from the product repository's Docker Compose stack, then runs a first workflow. It's for operators evaluating Flow, and takes about 10 minutes plus the first build.
What you'll have at the end
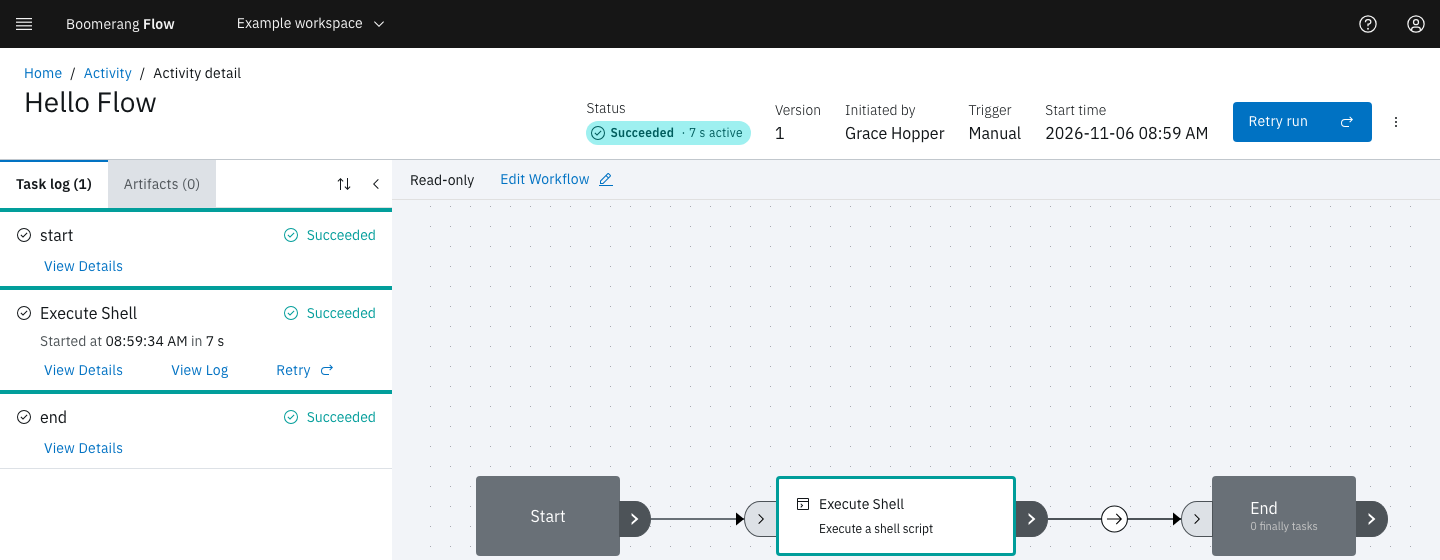
Flow at http://localhost:3000/apps/flow, with you signed in as its admin, a dispatcher running tasks on your laptop's Kubernetes, and a Hello Flow run with status Succeeded.
Before you start
You need:
- Git.
- Docker with Compose v2: the
docker composecommand, not the olderdocker-compose. - OrbStack, with its Kubernetes turned on. The stack's dispatcher is set up for it. Turn it on with
orb config set k8s.enable true, then restart OrbStack. kubectl, to copy OrbStack's cluster details for the dispatcher.- These ports free: 3000 (webapp), 7700 (core's API), 4380 (sign-in provider), 8333 (artifact store), 7702 (dispatcher), and 27017 on
127.0.0.1(MongoDB).
Warning
The stack is for evaluation only. Its encryption keys and activation code are published in the repository, and it turns off the dispatcher's authentication. Never carry its settings into a real install.
Start Flow
-
Clone the repository at the release tag:
git clone --branch 5.0.0-beta.39 https://github.com/boomerang-io/flow.git cd flow -
Give the dispatcher your cluster's details. It reads a kubeconfig at
docker/kube/config, which the repository doesn't include:mkdir -p docker/kube kubectl config view --context orbstack --minify --flatten --raw \ | sed 's#https://127.0.0.1:#https://host.docker.internal:#' > docker/kube/configOrbStack's context points at
127.0.0.1, which inside the dispatcher's container is the container itself.host.docker.internalreaches the cluster from there. -
Start the stack with the dispatcher:
FLOW_ENGINE_URL=http://service-core:7700 \ FLOW_DISPATCHER_LOGS_URL=http://service-dispatcher:7702/api/v1/logs/stream \ docker compose --profile stack --profile dispatcher up -d --buildWithout a profile, the stack runs MongoDB, the sign-in provider and the artifact store. The
stackprofile adds core and the webapp, and thedispatcherprofile adds Flow's Kubernetes dispatcher, with thekube-jobsexecutor. The two variables point the dispatcher at core on the stack's network. Every image builds from source, and core migrates and seeds the database before it serves anything, so the first start takes the longest. -
Wait until
docker compose psshowsservice-coreandclient-webas(healthy).
Sign in and activate
-
Open
http://localhost:3000/apps/flow. Flow shows You're not signed in. Select Sign in. -
Flow sends you to IDPZero, a local sign-in provider with no passwords. On Sign In to Account, choose Grace Hopper (Admin) under Select user to login as:, then select Sign In.
-
Flow shows G’day! Let’s activate Boomerang Flow. Enter
flow-local-activation-code-for-developmentin Activation code, and select Submit.The code is
FLOW_ACTIVATION_CODEonservice-coreindocker-compose.yml. On a new database, the first person to sign in enters it and becomes the admin. Sign-in and the first admin explains how a real install sets its own.
Flow opens on Home, with Admin in the side nav.
Run a first workflow
The starters under Start a workflow on Home don't make a good first run. Two depend on the HTTP Call tasks, which do nothing in 5.0.0. The third needs a MongoDB to query and a SendGrid account to email the results. Build a one-task workflow instead:
- On Home, select New workspace. In Create Workspace, enter the Display Name
Quickstart, and select Create. - Under Your workspaces, select Workflows on the Quickstart card.
- Select Create a new workflow, enter the Display Name
Hello Flow, and select Create. The editor opens on its Canvas tab. - From Add a task, drag Execute Shell onto the canvas. Link Start to it, and it to End.
- Select the node's edit (pencil) icon, then the Shell Script field. Enter
echo "Hello from Boomerang Flow", then select Update and Apply. - Select Create new version, enter a Version comment, and select Create.
- Select Workflows in the breadcrumb. On the Hello Flow card, select Run it, then Run and View.
The run page shows Running, then Succeeded. Getting started walks through the same steps with screenshots.
Verify it worked
Select Activity in the side nav. The Hello Flow run is listed with status Succeeded. A succeeded run proves every part works: sign-in, core, the dispatcher and your Kubernetes.
From the repository folder, check the services:
docker compose ps --format "table {{.Service}}\t{{.Status}}"Each of the six services shows (healthy). The two one-shot setup containers have exited, so they aren't listed.
SERVICE STATUS
client-web Up 2 hours (healthy)
idpzero Up 3 hours (healthy)
mongo Up 3 hours (healthy)
seaweedfs Up 3 hours (healthy)
service-core Up 2 hours (healthy)
service-dispatcher Up 3 hours (healthy)The webapp and core each answer a health check without signing in:
curl http://localhost:3000/apps/flow/health
curl http://localhost:7700/health{"status":"UP"}
{"groups":["liveness","readiness"],"status":"UP"}The dispatcher is connected when its log shows registered as:
docker compose logs service-dispatcher | grep "registered as"service-dispatcher-1 | [2026-11-05 21:19:46.345] [INFO] [44] io.bo.di.sd.Dispatcher : Dispatcher orbstack-kube-jobs (b6d777337d75) registered as <id> for task types [template, custom, script, ai, uploadartifact, downloadartifact].If a step fails
| Symptom | Cause | Fix |
|---|---|---|
up stops with "port is already allocated" |
Something else uses one of the ports in Before you start | Stop it, then run the up command again |
http://localhost:3000 doesn't answer for the first minutes |
Core migrates and seeds the database before it serves anything | Wait until docker compose ps shows service-core as (healthy) |
| No activation screen, and Admin is missing | Someone else signed in first and became the admin | Sign in as that user, or reset as in Stop or reset |
| Execute Shell stays Ready | No dispatcher is connected | Check the dispatcher's log for registered as. If docker/kube/config is a folder, Docker made it because the file was missing: remove it, repeat step 2 of Start Flow, and run the up command again. |
Stop or reset
Stop the stack and keep its data:
docker compose --profile stack --profile dispatcher downName the same profiles as up. Without them, down leaves core, the webapp and the dispatcher running.
To start again from an empty database, add -v:
docker compose --profile stack --profile dispatcher down -vWarning
down -v deletes the stack's volumes: the MongoDB database, stored artifacts and the sign-in provider's state. There's no undo. The next start is a new install that asks for the activation code again.
Next steps
- Installing: what a real install needs, and deploying Flow to a Kubernetes cluster.
- Configuring: the properties, routes and probes core needs.
- Getting started: build and run workflows in the webapp.
- Make your first API call: call core's API at
http://localhost:7700with a token.